Welcome to The Pink Kitchen.....where life is fashionably delicious!!!

Friday, November 23, 2012

Tiny Tots

I know I've mentioned my slight obsession with Pinterest. Never have I had so many great recipe ideas and inspirations right at my fingertips! Each time I'm on there I find something new and exciting. The only bad thing is if I log on when I'm hungry, I turn into a "pinning piggy" and suddenly I have 15 new dessert recipes on my pinboard. I can't help that I have a sweet tooth the size of Texas AND love to bake (a deadly combination). This isn't a dessert recipe, but it's one that caught my eye right away on Pinterest. I made a bunch of changes to the original recipe and this is what I came up with. Now if you'll excuse me, my sweet tooth itches and I need a Hershey's bar. 


Mini Squash Tots  (makes about 24)

Ingredients:

2 cups squash and/or zucchini, peeled
2 eggs
1/2 small onion, grated
1 cup parmesan cheese, grated
2/3 cup plain bread crumbs
1/2 tsp garlic powder
Salt and pepper

Directions:

1. Preheat oven to 400 degrees. Spray mini-muffin pan with non-stick baking spray.
2. Grate squash in food processor. Squeeze between paper towels to remove excess moisture. Add 2 cups (packed) to a large bowl.
3. Add onion and eggs to grated squash. 
4. Stir in 3/4 cup parmesan cheese and remaining ingredients.
5. Using a scoop, fill mini muffin cups to the top. 
6. Top each tot with a sprinkle of parmesan cheese.
7. Bake for approximately 30 minutes until very brown and crispy around the edges.
8. Allow to cool slightly for 5 minutes then remove from pan and serve warm.
These can be devoured "as is" or you can dip them in ketchup, ranch dressing, or horseradish sauce. Whatever your little taste buds are craving! :)

Friday, November 16, 2012

Missing in Action

I know, I know. I've been MIA for quite some time. And after multiple complaints recently, I've decided I need to start posting again. To be completely honest, blogging started to feel more like a chore than a hobby and I wasn't enjoying it as much. So now I'm hoping for a fresh start! It doesn't help that I've been addicted to Pinterest and all my time that was typically spent blogging has lately been spent on Pinterest. So I'm going to try to post more often. Don't get me wrong, I'm still in the Pink Kitchen multiple times a week as usual. I've tried so many new recipes over the past few months and now I'm kicking myself for not blogging about some of my favorites. With Thanksgiving and Christmas quickly approaching, there are sure to be many delicious recipes to look forward to. This is my favorite time of year, especially for cooking and baking. I can't think of a better time to blog! :)


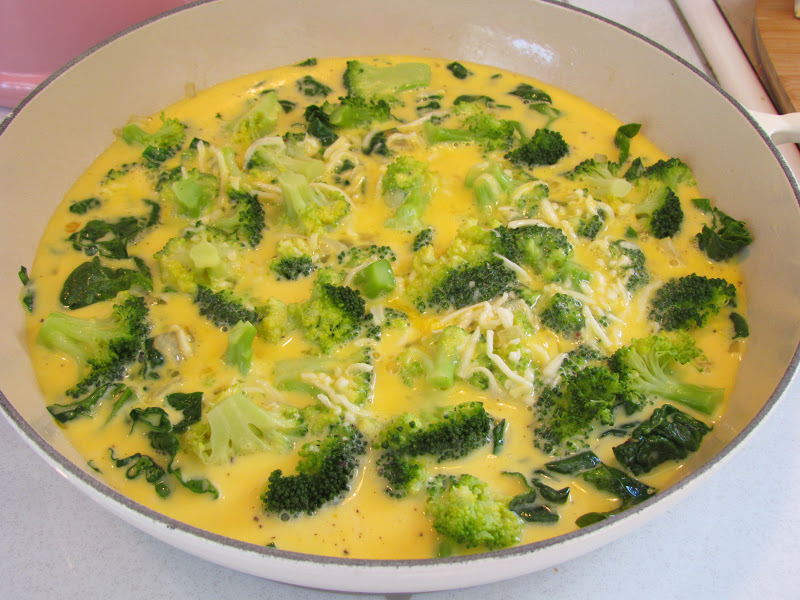
Broccoli and Spinach Frittata

Ingredients:

1 head of broccoli, chopped
2 cups chopped fresh spinach
1 onion, diced
4 Tbsp butter
10 eggs
3/4 cup half-n-half
salt and pepper
1 cup shredded mozzarella cheese
1 cup fresh grated parmesan cheese

Directions:

1. Preheat oven to 350 degrees.
2. Add 2 cups water to a large pot. Bring to a boil. Add broccoli. Cover and steam for about 3 minutes. Remove from heat and drain. (You won't want broccoli to be cooked through since it continues to cook in the oven.)
3. Melt 4 Tbsp butter over medium-low heat in a deep saute pan. Saute onions until soft and translucent. 
 4. Add chopped spinach and saute until it begins to wilt. 
 
5. Add broccoli and toss all veggies together then scrape them down from the sides of the pan so there's a nice even layer across the bottom of the pan. 
6. Beat together eggs, half-n-half, salt and pepper. Pour evenly over veggie mixture and turn off stovetop. 
 
 
7. Sprinkle mozzarella & parmesan cheese over the top of the frittata.
8. Bake in 350 degree oven for approximately 32 minutes until set and cheese is golden brown.
9. Remove from oven and allow to sit for 5 minutes before slicing. Enjoy!!!

Thursday, June 14, 2012

Good Morning

Yes, that's right. Even the smoothies are pink in The Pink Kitchen! :) This is my favorite blend so far when it comes to smoothies. This is what I've been having for breakfast. I try to avoid dairy as much as possible, so I don't use a lot of yogurt in mine. For that reason, I buy one small 6 ounce-size yogurt which is typically enough for at least four smoothies. I just pop it back into the fridge each time. This smoothie is sweet, creamy, and very filling. All the fresh fruit makes me feel energized and ready to start the day! I hope you all have a great morning!


The Pink Kitchen Smoothie


Ingredients:


1 1/4 cup fresh pineapple chunks (about 7 large chunks)
1/2 fresh mango, cubed
10 frozen black cherries
1/8 cup french vanilla yogurt (I like Stonyfield Organic)
2 tsp honey
1/4 cup cold water
8 ice cubes (5 cubes if using large ones from trays)


Directions:


1. Add fruit to the blender, followed by yogurt and honey. Add water and ice cubes last.
2. Blend on high until smooth. Pour into a large glass and ENJOY!


Monday, June 11, 2012

Kale Chips, Seriously?

I am cracking up writing this post because of all the controversy one little kale chip can cause. To quote my husband, these kale chips were "the worst thing to ever come out of the Pink Kitchen." I swear he talked about how horrible they were all day long. LOL! But do not be discouraged. He was the ONLY one that didn't like them. Luckily we had friends over later that night who were willing to test them out. Chris insisted that everyone was going to hate them. Guess what....he was wrong. Again. Our friends quite enjoyed them, thank you very much. Along with their 2-year-old son who kept asking for more "chips". Hahaha! And for the record, I loved them!


Kale Chips


Ingredients:


1 bunch of kale
Olive oil
Sea salt


Directions:


1. Preheat oven to 300 degrees.
2. Wash the kale well under warm water. Cut into large pieces, removing the tough stems and center ribs. Dry thoroughly in a salad spinner. (I spun mine 3 times, emptying the water out of the bottom in between spins.)
3. Dump dry kale into a bowl and drizzle with olive oil. Start with about 1 Tbsp. Toss the kale with your hands until all leaves are coated. You don't want leave to be drenched in oil, but you want them to all be nice and shiny with a thin coating of olive oil on each leaf. Add more olive oil if necessary. Sprinkle with as much sea salt as you'd like. I used a LOT!
4. Place in a single layer on baking sheets. Try to place them curly side down so the air can circulate underneath and make them crispy. Bake for 22 minutes. Then gently flip each piece over and bake for an additional 5 minutes. (I used stoneware sheets, so mine took a little longer to bake. If using aluminum baking sheets, they may be finished baking at 22 minutes. They will be crispy and not at all floppy when they are ready. They will also have a deep golden color, especially at the curly parts.)


Please try these and let me know if you like them!!! 


Wednesday, June 6, 2012

So Saucy

There's nothing like homemade pasta sauce. I like mine sweet, rich, and thick. This one was a hit the first time I made it so now it's become a stable. It's pretty easy, too. Just throw everything in a pot for 3 hours. Can't beat that! You can always adjust the spices or use fresh herbs if you have them on hand.  This is my favorite sauce over spaghetti and meatballs. Basic, but delicious! 


Homemade Spaghetti Sauce


Ingredients:


1 onion, chopped
4 garlic cloves, minced
2 Tbsp olive oil
1 (28 oz) can whole peeled tomatoes
2 (6 oz) cans tomato paste
1 tsp dried oregano
1/2 tsp dried basil
1/4 tsp crushed red pepper flakes
1 Tbsp granulated sugar
1/4 cup dry red wine
1/4 cup water


Directions:


1. Heat olive oil in a large pot or dutch oven over medium-low heat. Chop onion and garlic and place in pot. Cook until translucent and tender (about 2-3 minutes). 
2. Add red wine and bring to a simmer. Add remaining ingredients.
3. Cover and simmer over low heat for 3 hours, stirring occasionally. (If making with meatballs or sausage, add them to the sauce after they are browned to add even more flavor. Do this during the last 15 minutes. Also, you can help the whole tomatoes break down by chopping them with a wooden spoon throughout the cooking process.)
I've never tried it, but I'm sure this sauce could also be made in the crock pot! Follow step #1 above and then add everything to the crock pot. Cook on low for at least 6 hours.

Monday, May 21, 2012

Whole Lotta Latkes

It's hard to believe June is almost here! May was a busy month and didn't spare me much time to post new recipes. Needless to say, I've still been cooking and baking up a storm. Actually, I've been repeatedly making my chocolate chip granola bars over and over again. They're great for snacking (specifically snacking while driving which I tend to do a lot of). 
You can find the recipe here: 
http://alissaspinkkitchen.blogspot.com/2012/03/move-over-quaker.html


I've also been doing "breakfast for dinner" more frequently. It's a great option when you're short on time or haven't gone grocery shopping all week. I almost always have eggs and potatoes on hand. Potatoes are so versatile, especially when it comes to breakfast. I've always wanted to make these potato latkes and I'm so glad I finally did. They are so easy and are great for breakfast, lunch, or dinner! I thought they tasted pretty darn good reheated the next day, too! Put a little cloud of sour cream on top and some chives and you will be in crispy, creamy potato heaven! 


Potato Latkes


Ingredients:


1 pound Yukon Gold potatoes (about 3 potatoes)
1/2 small onion, grated 
1 large egg, lightly beaten
2 1/2 Tbsp flour
1/2 tsp salt
1/4 tsp pepper
1/2 cup vegetable oil
Sour cream and chives (optional)


Directions:


1. Grate potatoes and onion using a food processor or the large hole of a box grater. Place potatoes and onion in the center of a paper towel. Bring the end of the towel together and twist to form a pouch. Hold over the sink and squeeze out as much excess moisture as possible. 
2. Place grated potatoes and onion in a large bowl. Add egg, flour, salt, and pepper. Stir well to combine. 
3. Heat oil in a skillet over medium-high heat. Carefully drop tablespoons of potato mixture into oil. Spread each into a thin circle with the back of a spoon. Cook 2-3 latkes at a time. Flip once bottoms are golden brown. 
4. Continue to cook on opposite side until bottom is golden brown. Drain on paper towels.
5. Serve warm topped with sour cream and chives. 


Sunday, April 15, 2012

Gotta Love Giada

What's not to love about Giada De Laurentiis? Not only is she adorable, but her recipes are amazing, too! I was lucky enough to meet Giada for the second time at her recent book signing at Williams-Sonoma in the  King of Prussia Mall. The signing started at 12:00 and I meant to get there at 11:00, but accidentally overslept. So by the time I got there, the line was miles long. Two and a half hours later, I got to see Giada and get my book signed. She was signing her latest cookbook, "Weeknights With Giada". I have all of Giada's cookbooks, but so far this one is my favorite. Most of the meals are quick and have short lists of ingredients. The "Ham, Gruyere, and Apple Panini" really caught my eye and is the first recipe I chose to make from the book. It's delicious! Gruyere is now my new favorite cheese. It's nutty and a little bit sharp. I would describe it as a cross between Swiss and Parmesan. YUM!


Ham, Gruyere, and Apple Panini (recipe courtesy Giada De Laurentiis)


Ingredients:


2 Tbsp butter, at room temperature
2 Granny Smith apples, peeled, cored and sliced 1/4 inch thick
1 Tbsp chopped fresh thyme leaves
8 (1/2-inch-thick) slices country-style white bread
1/2 cup whole grain mustard
2 cups shredded Gruyere cheese
8 (1oz.) slices Black Forest ham


Directions:


1. In a skillet, melt butter over medium heat. Add the apple slices and thyme. Cook, stirring occasionally, until the apples are slightly soft, about 4 minutes. Cool for 5 minutes.
2. Preheat panini press or panini pan. Spread each bread slice with 1 Tbsp mustard. 
3. Arrange 1/4 cup cheese on two bread slices. 
4. Top with ham and apple slices.
5. Add remaining cheese and place bread slices on top.
6. Grill sandwiches until cheese has melted and bread is golden and crispy. (About 5-6 minutes)


***I made a few changes to this recipe. I used a sprinkle of dried thyme instead of fresh and used fresh Ciabatta bread instead of white bread. If you don't have a panini press or pan, you can use a grill pan and place a heavy pan on top of the sandwiches to press them down while they cook. 


Here's some pictures from the book signing!


Giada signing my book :)