Welcome to The Pink Kitchen.....where life is fashionably delicious!!!

Tuesday, May 24, 2011

A New Spin on Lasagna

I've been neglecting my blog! It's been so long since my last post, but I have lots of new recipes that I'm trying so expect some major deliciousness in the near future. This recipe goes out to all lovers of lasagna and buffalo chicken wings! It's a nice change to classic lasagna and the flavors combine really well. Plus you can make it as spicy or as mild as you like!


Buffalo Chicken Lasagna (altered from Pampered Chef recipe)


Ingredients:


1 large can tomato sauce (or 2 small cans)
1 pound chicken breasts, cooked and diced
1 medium onion, chopped
1 bell pepper, diced
3 Tbsp. hot sauce (or more, to taste)
1 small container ricotta cheese
2 cups mozzarella, divided
1 egg
3 cloves garlic, minced
1/2 tsp salt
9 uncooked no-boil lasagna noodles (I used Barilla)
1/2 cup crumbled bleu cheese
Drizzle of olive oil


Directions:


1. Preheat oven to 350 degrees.
2. Heat a drizzle of olive oil in pan and saute onion, bell pepper, and garlic until tender.
3. While onion and pepper are cooking, combine ricotta, 1 1/2 c mozzarella, egg, and salt in a separate bowl. Combine tomato sauce and hot sauce in another bowl.
4. Grease a 9x9 inch baking dish. Spread a small amount of tomato sauce mixture on bottom of dish. Layer all ingredients starting with noodles, then ricotta mixture, then the veggies and chicken. Repeat layers two more times. Top with tomato sauce mixture and sprinkle with 1/2 cup remaining mozzarella.
5. Bake covered for for 45 minutes. Remove from oven, top with 1/2 cup bleu cheese, and bake an additional 15-20 minutes uncovered.


Monday, April 18, 2011

Jalapeno Popper Burgers

I have to hand it to Rachael Ray. I'm not a huge fan of hers, but these burgers are freakin' AMAZING!!! (She makes them as sliders, but I made regular-sized burgers because sliders give me the creeps. Don't ask why!?!?) They are really easy to make and don't even require the regular addition of ketchup, mustard, mayo, etc. These are going to become a staple on my summer dinner menu. I just fired up the grill for the first time since last summer/fall. I love cooking on the grill and was so excited to make these. They definitely did not disappoint! 


Jalapeno Popper Burgers (altered from Rachael Ray recipe)


Ingredients:


2 large, fresh jalapeno peppers
Olive oil, for drizzling
8 ounces cream cheese, softened
2 Tbsp grated onion
1 large garlic clove, minced
Salt and pepper
1/2 tsp cumin
1 1/4 lb lean ground beef
1 block sharp cheddar cheese, thinly sliced
1 package pita bread


Directions:


1. Preheat grill on medium heat while preparing ingredients. 
2. Add grated onion, garlic, salt, pepper, and cumin to softened cream cheese and stir to blend. Set aside.
3. Form ground beef into patties; whatever size you like. I made 5 average size burgers. Place on grill over medium heat and close lid.
4. Core and seed jalapeno peppers using the handle of a spoon or fillet knife. Slice into rings. Heat a drizzle of olive oil over medium heat and cook peppers until slightly blackened and tender.
5. Once burgers appear to be cooked half-way through, flip them over. Place a dollop of the cream cheese mixture in the middle and top with a slice or two of the sharp cheddar cheese. Close grill lid and continue to cook for about 5 more minutes until burgers are done and cheese is melted.
6. Once burgers are off the grill, top with cooked jalapenos. I put the burgers on whole wheat pita bread (cut to size with a biscuit cutter) instead of hamburger rolls. I liked this so much more, but rolls would be fine, too!


Hope you like these burgers as much as I do! Oh, and what do you guys think of my new apron? :)
People driving by my house probably crack up when they see me outside grilling in a pink apron! Haha! Oh, and just to clarify, I don't only cook for shoes. I also cook for handbags, makeup, and jewelry! ;)


Sunday, April 10, 2011

Breakfast for Dinner

Breakfast for dinner? Sure, why not?! I'm a big fan of breakfast food and would eat it any time of day. Plus I was looking for an excuse to try out my brand new All-Clad griddle pan (which I love, by the way). French toast is still my all-time favorite, but pancakes have grown on me over the years. I decided to make pancakes from scratch after using Bisquick and other mixes in the past. You won't believe the difference a little fresh egg can make! This is a basic recipe, but can be switched up by adding blueberries or chocolate chips. I decided to top mine with some blueberry syrup. YUM!


Classic Pancakes


Ingredients:


1 cup unbleached all-purpose flour
1 Tbsp sugar
2 tsp baking powder
1/2 tsp salt
1 cup milk or almond milk (original or vanilla)
2 Tbsp canola oil
1 egg


Directions:


1. Whisk together flour, sugar, baking powder, and salt in a small bowl.
2. In a separate bowl, whisk together milk, oil and egg.
3. Add flour mixture to egg mixture and stir just to moisten- a few lumps are fine.
4. Cook pancakes on a griddle over medium heat. You'll know it's time to flip them when little air bubbles form along the outside.


I am hooked on this Blueberry Syrup by Stonewall Kitchens. You can buy it at Reading China and Glass in Reading, PA or at Gardner's Chocolates and Gift Shop in Pennsburg, PA. It's delicious drizzled on pancakes, waffles, french toast, or ice cream.

P.M.S. Cake

As promised, here's Ina Garten's FABULOUS chocolate cake recipe. To me, it's the perfect solution to a wicked P.M.S. chocolate craving! That's why I have renamed it "P.M.S. Cake". Believe me, it will make you happy!


Chocolate "P.M.S." Cake


Ingredients:


Butter for greasing the pans
1 3/4 cups all-purpose flour, plus more for pans
2 cups sugar
3/4 cup cocoa powder
2 tsp baking soda
1 tsp baking powder
1 tsp salt
1 cup buttermilk, shaken
1/2 cup vegetable oil
2 large eggs, at room temperature
1 tsp pure vanilla extract
1 cup freshly brewed hot coffee
Chocolate frosting (recipe below)


Directions:


1. Preheat oven to 350 degree. Butter two 8-inch round cake pans. Line with parchment paper, then butter and flour the pans.
2. Sift the flour, sugar, cocoa, baking soda, baking powder, and salt into the bowl of an electric mixer. Mix on low until combined. In another bowl, combine buttermilk, oil, eggs, and vanilla. With mixer on low speed, slowly add wet ingredients to the dry. Add hot coffee and mix until combined.


3. Pour batter into prepared pans and bake for 35-40 minutes until a cake tester comes out clean. Cool in the pans for 30 minutes, then turn out onto a cooling rack and cool completely.


Chocolate Frosting


Ingredients:


6 ounces good semisweet chocolate (I used Ghiradelli)
1/2 pound (2 sticks) unsalted butter, at room temperature
1 large egg yolk, at room temperature
1 tsp pure vanilla extract
1 1/4 cups sifted confectioners' sugar
1 Tbsp instant coffee powder


Directions:


1. Chop the chocolate and place in a heat-proof bowl set over a pan of simmering water. Stir until just melted and set aside until cooled to room temperature.


2. In the bowl of an electric mixer, beat butter on medium-high speed until light yellow and fluffy, about 3 minutes. Add egg yolk and vanilla and continue beating for 3 minutes. 
3. Turn mixer on low and gradually add confectioners' sugar, scraping down bowl as necessary, until smooth and creamy.
4. Dissolve the coffee powder in 2 teaspoons of the hottest tap water. On low speed, add the chocolate and coffee to the butter mixture and mix until blended. Don't whip! Spread immediately on the cooled cake. (For less intense coffee/mocha flavor in the icing, decrease coffee powder to 1 tsp.)


To frost the cake:


1. Place four small rectangular pieces of wax paper along the outsides of the cake stand to keep it from getting messy. Place one layer, flat side up, on cake stand.


2. With a knife or offset spatula, spread the top with frosting.


3. Place the second layer on top, rounded side up.


4. Spread frosting evenly on the top and sides of cake. Remove wax paper by pulling slowly.


5. DIG IN!!!!!


Monday, April 4, 2011

Tuna Tapas

"Tapas" is the word for a variety of appetizers, or snacks, in Spanish cuisine. They can be either warm or cold. In Spain, dinner is typically served between 9 and 11pm, which leaves a large period of time between work and dinner. It is common for tapas to be served during this time. I could eat tapas as a meal, since I like to eat small bites of different kinds of food in one sitting. One of my favorite restaurants, Viva, is a tapas lounge located in Reading, PA. They have amazing tapas there, in particular the Bacon-Wrapped Mediterranean Dates and the French Baked Brie Puff. Yum! This is a great place to go if you want fabulous tapas and cocktails. (Their main menu has great selections as well!) This recipe, eaten cold, can be served as tapas or as a meal. 


Tuna Shells with Tomato-Caper Relish

Ingredients:

10 pasta shells 
1 lemon (1 tsp zest, 1 Tbsp juice)
2 cans white albacore tuna in water, drained
1/2 c mayo
2 Tbsp chopped fresh parsley
1/4 small onion, finely chopped (or substitute onion powder or Tastefully Simple Onion Onion, about 2 tsp)
3 Tbsp caper, drained
1 tsp ground black pepper
2 medium vine-ripened tomatoes


Directions:

1. Cook pasta shells according to package. Set aside to cool.  
2. Combine 1 tsp lemon zest, tuna, mayo, 1 Tbsp. parsley, onion, 1 Tbsp capers, 1/2 tsp pepper. Spoon tuna filling into cooled pasta shells (about 1 heaping Tbsp per shell).
3. For the relish, core and seed the tomatoes, then finely dice. Combine tomatoes, 1 Tbsp lemon juice, 1 Tbsp parsley, 2 Tbsp capers, and 1/2 tsp black pepper. Garnish eat tuna-stuffed shell with about 1 Tbsp of relish. Serve cold.

Alissa's notes: Be sure to drain the tuna very well, so the filling is not watery. Also, cook a few extra pasta shells since a few usually tear during boiling. The capers add saltiness to this dish, so if you choose to omit them, you may want to add extra salt. Here is the website for Viva Good Life Bistro: www.vivagoodlife.com


The Best of Ina


I'm a huge fan of Ina Garten from the show "Barefoot Contessa" on The Food Network channel. I love her show and I really love her cookbooks. Most of the time, I can rely on her show to give me great recipe ideas without all kinds of crazy, hard-to-find ingredients. Her dinner recipes are good, but her dessert recipes are even better! I love chocolate as much as the next girl, but sometimes I get a craving for something lemon. This lemon cake is so dense and rich, almost like a heavy pound cake. You don't even need a mixer to make this!


Lemon Yogurt Cake (recipe by Ina Garten)


Ingredients:


1 1/2 cups all-purpose flour
2 tsp baking powder
1/2 tsp kosher salt
1 c plain whole-milk yogurt
1 1/3 c sugar, divided
3 large eggs
2 tsp grated lemon zest (2 lemons)
1/2 tsp pure vanilla extract
1/2 c vegetable oil
1/3 c freshly squeezed lemon juice


For the glaze:


1 c confectioners' sugar
2 Tbsp freshly squeezed lemon juice


Directions:
1. Preheat oven to 350 degrees. Grease and flour loaf pan. Line the bottom with parchment paper.


2. Sift together flour, baking powder, and salt into one bowl. In another bowl, whisk together yogurt, 1 c sugar, eggs, lemon zest, and vanilla. Slowly whisk the dry ingredients into the wet ingredients. With a rubber spatula, fold the vegetable oil into the batter, making sure it's all incorporated. Pour batter into prepared pan.


3. Bake for 50-60 minutes, or until a cake tester/toothpick placed in the center comes out clean. Meanwhile, combine the 1/3 c lemon juice and remaining 1/3 c sugar in a small bowl.


4. Heat lemon juice and sugar in a small sauce pan over low heat until the sugar dissolves.


5. When the cake is done, allow it to cool in the pan for 10 minutes. Then remove from pan and place on a cooling rack over a cookie sheet. While the cake is still warm, pour the lemon sugar mixture over the cake and allow to soak in. Cool.


6. For the glaze, combine confectioners' sugar and lemon juice and drizzle or pour over cooled cake. (I omitted this step. This cake was sweet enough on it's own.)


So moist, delicious, and half-way gone!


Stay tuned for an AMAZING chocolate cake recipe from Ina coming soon!

Friday, March 18, 2011

Some of my Favorite Things

This is like Oprah's favorite things, "Pink Kitchen" style. Everyone has certain items in their kitchen that are their favorites or that they constantly reach for. Here are mine:


1. KitchenAid Artisan Stand Mixer. Of course my pink KitchenAid mixer is at the top of my list since it's what started this crazy "pink" obsession in the first place. This mixer is my favorite for making cookies or mashed potatoes. ($299.99, Macys.com)

2. Le Creuset 5 1/2 quart French oven and 3 1/2 quart Braiser. I cannot tell you how much I love these. I use them constantly.  The French oven is great for roasting a whole chicken or for soups and chili. The casserole pot can be used the same way as a saute pan. I am always cooking chicken breast or ground beef in that one. These can be purchased at Williams-Sonoma (www.williams-sonoma.com) or the Le Creuset outlet in The Philadelphia Premium outlets in Limerick.  Also, I purchased the stainless steel knob on the yellow one at the outlets. The regular black knobs can only withstand a certain temperature in the oven. I think the yellow color (Citron at Williams-Sonoma) is discontinued, but the Dune shade is still available. (French oven, $240. Braiser, $205. Williams-sonoma.com)

3. Pampered Chef Bamboo Knife Block set. These are the best knives I've ever used! Plus, this set comes with all the knives (except for the pink one in the picture), kitchen shears, and a sharpening tool. ($415, www.pamperedchef.com)

4. Deni 56-Blade Meat Tenderizer. If your chicken always turns out tough (like mine used to) this is a lifesaver! This makes chicken and steaks so tender you could cut them with a butter knife! I purchased mine from QVC, but I think it's currently out of stock. They are also available on Amazon. ($26 amazon.com)

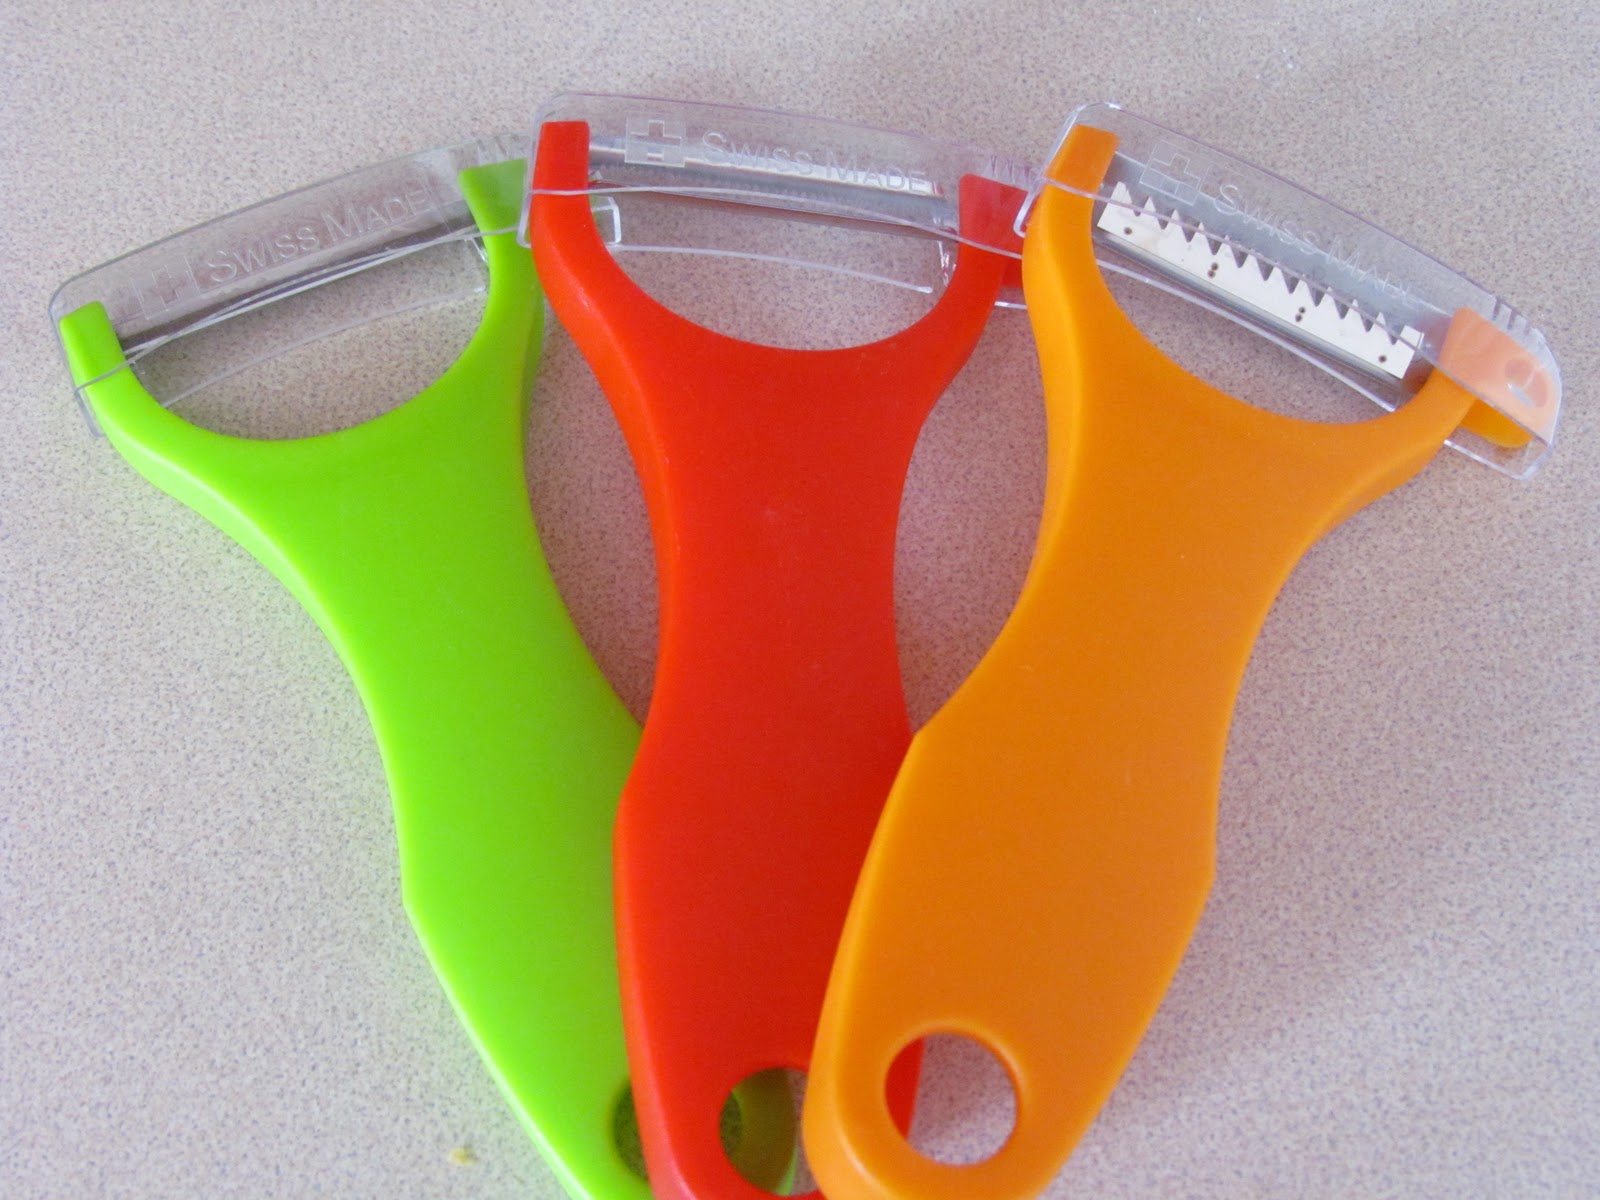
5. Swissmar Peelers, set of 3. These peelers don't look like anything special, but they are! Includes a straight edge peeler, serrated edge peeler, and a julienne peeler. The straight edge is great for potatoes and carrots. The serrated edge can be used on softer items like peaches or tomatoes. I can't wait to use the julienne peeler this summer to make "pasta" out of zucchini, since this one slices into thin strips. Only $15 for the whole set! What a steal! ($15, williams-sonoma.com)

6. Nielsen-Massey Vanilla Bean Paste. This stuff rocks! It has little vanilla bean flecks in it so it makes homemade vanilla ice cream look gourmet. A little goes a long way. One bottle usually lasts me about 1 year. Has more flavor than vanilla extract so you don't need to use as much. I swear it makes chocolate chip cookies taste better! ($11, Williams-sonoma.com)

7. Tastefully Simple Onion Onion and Garlic Garlic seasoning blend. I love fresh garlic and onion, but sometimes I'm a little lazy and don't feel like chopping onions and messing with stinky garlic. These seasoning blends make your dish taste like you used the real thing. I use these all the time. The Onion Onion is great in meatballs! ($8.99 each, Tastefullysimple.com)

8. Stove-side must haves: Pepper mill, Salt Pig, and Olive oil. I like to have these right beside my stove so I can just grab them while I'm cooking. The pepper mill and salt pig are from HomeGoods. The olive oil dispenser is from Reading China and Glass.

9. Pampered Chef Garlic Press. The BEST garlic press on the market. You don't even have to peel the garlic clove. Just throw the whole thing in and squeeze! The little tool that comes with it is for cleaning and it attaches directly to the inside of the handle so it doesn't get lost. ($16.50 Pamperedchef.com)

10. All-Clad Measuring Cups and Measuring Spoons. First of all, I love All-Clad. They make the best products and almost all of their items have a lifetime warranty. These are not only cute (they resemble the full-size stainless steel All-Clad pots), but super durable too. ($50 if you buy them as a set, williams-sonoma.com)

11. Pampered Chef Stoneware. I'm sure everyone gets sick of hearing how much I love this stuff, but it really is amazing! In the picture above, I included a brand new stone, so you can see how much I've used the yucky brown one. Even though it looks gross, this is how you want it to look. The uglier it gets, the better it performs! It creates its own non-stick surface.
(Medium bar pan, $24. Pamperedchef.com)

12. Metrokane Rabbit Wine Tool Kit. If you love wine, you need a rabbit. Opens wine like nobody's business! Simply love it! I love to have a glass of wine while I'm cooking dinner. Turn on a little Michael Buble....heaven! ($49.99, Bedbathandbeyond.com)

Thanks for checking out my favorite things! Speaking of wine, I think I might have a glass!


***Anyone interested in Pampered Chef products, please contact my mom, Sue Greer via email at sgreer48@comcast.net. She'd be happy to discuss the products with you or set a date to host your own Pampered Chef party and earn free products! You can also order directly from her website: http://www.pamperedchef.biz/suegreer