Welcome to The Pink Kitchen.....where life is fashionably delicious!!!

Sunday, September 12, 2010

Sexy Lil' Kitchen

I've always been intrigued by the idea that food can be an aphrodisiac. Years and years ago, when Sharon Osbourne still had her own talk show, she had on a guest/author named Jacqui Malouf. They were discussing a cookbook called "Booty Food" which I went and purchased a few days later (and has been one of my favorite cookbooks ever since). The book describes booty food as "any food that causes weak knees, accelerated heartbeat, tingly body parts, and other symptoms traditionally associated with falling in love". Did I get your attention yet? Here are just a few foods that this book classifies as having aphrodisiacal qualities:


-Cheese
-Garlic
-Walnuts
-Artichokes
-Figs
-Mushrooms
-Onions
-Strawberries
-Oysters
-Shrimp
-Chocolate
-Honey
-Champagne
-Coffee
-Ruby Port


I recently made this recipe for Pork Tenderloin with Port-Infused Fig Sauce. I know, it sounds really complicated, but it's so simple and so delicious! The book suggests to prepare this meal "anytime your relationship needs a little pick-me-up".  I actually wanted to make this dish a few months ago, but had a difficult time finding fresh figs.  Fresh figs are in season right now and can be found at most grocery stores in the produce section.  Ruby port, which is also used in this recipe, can be found at any liquor store. As for the consequences of consuming this meal with your significant other, I will not be held personally responsible for whatever may happen later that evening. All I'm going to say is, well....... you can thank me later!


Pork Tenderloin with Port-Infused Fig Sauce


Ingredients:


-20 ounce pork tenderloin
-drizzle of olive oil
-2 cups ruby port
-8 ounces ripe black figs
-salt and pepper to taste


Directions:


1. Preheat oven to 375 degrees. Rub pork tenderloin with olive oil, salt, and pepper. Place on a baking sheet and cook until internal temperature reaches 160 degrees. You can also cook the pork on the grill over medium heat.


2. While pork is cooking, pour ruby port into a saucepan and cook over high heat until it reduces by half.


3. Peel and mash the figs, saving two for garnish. (The skin can be removed easily by cutting the fig in half and then simply squeezing the outside.) Add the mashed figs to the port syrup, and simmer on low heat for 10 minutes.


4. When pork is finished, let rest for about 10 minutes, then slice into medallions. Serve with fig sauce and garnish with fig halves if desired.


Alissa's notes: In case you're not sure how long to cook the pork, most pork tenderloin packages give you guidelines for how long to cook it per pound. I like to use a meat thermometer to check for doneness, because if you slice into it, all the juices run out. 


Monday, September 6, 2010

Easy Entertaining

I think I may have found one of the easiest meals for entertaining (besides pasta)! In the past I have cooked the big turkey dinner, complete with mashed potatoes, gravy, green bean casserole, and all the fixings. It may be delicious when it's all said and done, but the prep work is just too stressful! Your guests begin to arrive and you can't even enjoy yourself because you're still slaving over the stove! I put together a quick, but tasty menu to impress your guests, and cut back on your stress. London Broil isn't known for being the best cut of beef. It can typically be tough and dry, but with the right marinade, it will melt in your mouth. I found this marinade recipe on Allrecipes.com, which is one of my go-to websites when I need a new recipe. I have used this marinade for London Broil a few times now, and I absolutely love it! But before you start "marinading", you have to get your hands on a good meat tenderizer. I have the blade-style tenderizer, which cuts hundreds of "mini-slits" in the meat so all of your marinade can soak right in. The tenderizer also helps break down the fibers of the meat, preventing it from becoming chewy and tough. The combination of the tenderizer and this marinade makes the meat so tender, you might even think you're eating filet mignon. The side dish to accompany the London Broil is super simple, and no, it's not baked potatoes. It's Vidalia Onions with Bacon Butter. Isn't everything better with bacon? The onions are stuffed with a bacon, butter, and bleu cheese filling, and individually wrapped in foil packets. I'm not an onion-lover, but I could easily eat a whole one of these! The heat of the grill really brings out the sweetness of the onions. Believe me, it tastes even better than it sounds! I also made green beans to go along with this meal, but any veggie will do! Now you can entertain and enjoy yourself at the same time! What a fun concept!


The Best London Broil

Ingredients

  • 3 cloves garlic, minced
  • 1/2 cup soy sauce
  • 2 tablespoons vegetable oil
  • 2 tablespoons ketchup
  • 1 teaspoon dried oregano
  • 1 teaspoon ground black pepper
  • 1 (2 pound) London Broil 

Directions


  1. In a small bowl, mix together garlic, soy sauce, oil, ketchup, oregano, and black pepper. Pierce meat with a tenderizer (or a sharp fork) on both sides. Place meat and marinade in a large resealable plastic bag. Refrigerate 8 hours, or overnight.
  2. Preheat grill for medium-high heat.
  3. Lightly oil the grill grate. Place steak on the grill, and discard marinade. Cook for 5 to 8 minutes per side, depending on thickness. Use a meat thermometer to test for doneness.


Alissa's notes: Be sure to let the meat rest for at least 10 minutes before cutting. This helps the juices reabsorb throughout the meat. If you cut into meat right after it's finished cooking, all the juices run out and you're left with a dry piece of meat. Yuck!


Grilled Vidalia Onions with Bacon Butter (recipe courtesy The Neely's)

Ingredients
  • 4 large Vidalia onions
  • salt and freshly ground black pepper
  • 1 stick unsalted butter, room temperature
  • 3 slices bacon, cooked and crumbled
  • 2/3 cup crumbled blue cheese
  • 2 tablespoons freshly chopped thyme leaves

Directions

Special equipment: Heavy duty aluminum foil
Preheat grill to medium heat.
Cut onion top and "backtail" so onion can sit flat. Peel the onion. Using a parking knife cut a hollow cone-like shape into the center of the onion making sure not to go all the way to the bottom. Salt and pepper the cavity. Place onions on individual squares of heavy duty aluminum foil.
Add the butter, bacon, blue cheese, and thyme to a bowl and mix until well combined. Add large dollops of the butter to each cavity of the onions. Fold the aluminum foil all around the onion, gathering at the top and sealing to create a tent.
Place on the grill over direct heat and cover the grill. Cook for 30 minutes until onions are soft. Let cool for 5 minutes before opening the foil packet and serving.

Alissa's notes: The only alteration I made to this recipe was using dried thyme instead of fresh. I only used a sprinkle of thyme, because I wanted the bleu cheese and bacon flavors to really stand out. I think you are really going to love these, and they look so cute in their own little foil packets. (My dad says they look like Hershey Kisses, and they do!)


By the way, this is the meat tenderizer I use and love. It's the Deni 56-blade meat 
tenderizer. It's great for chicken, too! I literally use it EVERY time I make beef or chicken!


You can find it on QVC:
http://www.qvc.com/Deni-56-Blade-Meat-Tenderizer-Search-Results.product.K8232.html?sc=K8232-SRCH&cm_sp=VIEWPOSITION-_-1-_-K8232&catentryImage=http://images-p.qvc.com/is/image/k/32/k8232.001?$uslarge$

Tuesday, August 31, 2010

The "Love Apple"


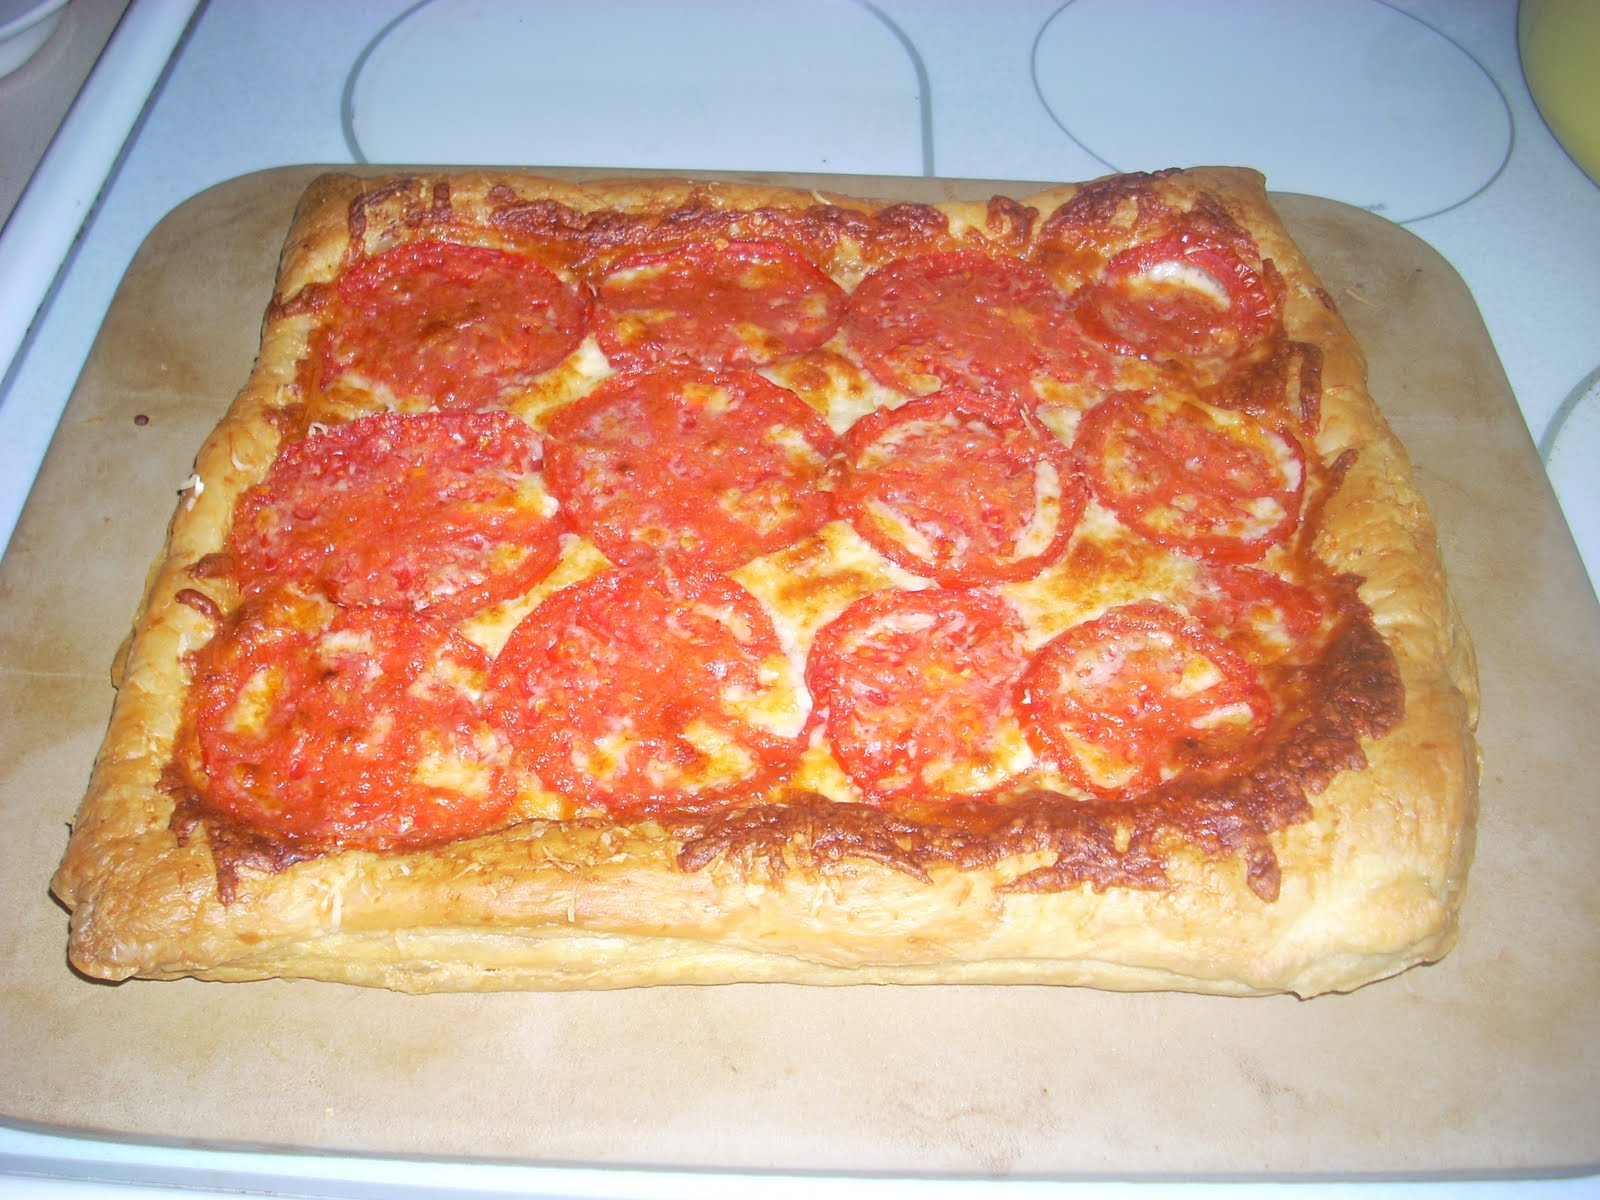
There is nothing better than a nice, ripe tomato in the summertime. I bet you never knew that the tomato (berry, fruit, vegetable, whatever it may be) has quite an extensive history. In the 1600s, Americans and Europeans actually believed that the tomato was poisonous! They kept this belief for hundreds of years and would only use tomatoes for decorative purposes. It wasn't until the French starting calling tomatoes, pommes de'amore, or "love apples", that it became popular in the culinary world. The French actually believed that the tomato had aphrodisiacal qualities so that is where the term "love apple" came from. I decided to use up some of my little "love apples" from the garden by making this Rustic Tomato Tart.  If you are a pizza lover, you have got to try this one! It will literally transport your taste buds and make them believe you are at an outdoor bistro in Paris. Use as much mozzarella as you want! The tomatoes become so soft that they almost act as a sauce. How can you ever go wrong with a recipe that uses puff pastry? Yum! I'll take this buttery, flakey crust any day over traditional pizza crust! According to experts, red wine goes best with pizza, especially Chianti. So pour yourself a glass, throw on your favorite music to relax to (mine would be Michael Buble), and pretend you're in Paris!


Rustic Tomato & Mozzarella Tart

Ingredients:

  • 2 or 3 ripe red and yellow tomatoes, about 8 oz. total, cored and cut into slices 1/8 inch thick
  • Salt, to taste
  • 1 garlic clove, finely chopped
  • 1 Tbs. unsalted butter, melted
  • 8-by-10-inch rectangle of frozen puff pastry, cut in half and thawed in the refrigerator
  • 3/4 cup shredded whole-milk mozzarella cheese
  • 4 Tbs. grated hard cheese, such as Parmigiano-Reggiano
  • 2 Tbs. chopped fresh basil
  • Olive oil for drizzling

Directions:

Place the tomato slices on paper towels, season with salt and let drain for 30 to 60 minutes.

Position a rack in the upper third of an oven and preheat to 400°F.

In a small bowl, stir together the garlic and butter. Place the puff pastry rectangles on a baking sheet lined with parchment paper. Brush with the garlic butter and season with salt. Leaving a 1/4-inch border, sprinkle the pastry evenly with the mozzarella and 2 Tbs. of the Parmigiano-Reggiano. Arrange the tomato slices on top and sprinkle with the remaining 2 Tbs. Parmigiano-Reggiano.

Bake until the pastry is puffed and golden, 25 to 30 minutes. Sprinkle the tarts with the basil and drizzle with olive oil. Serve immediately. Serves 6 to 8.

Adapted from Williams-Sonoma Cooking from the Farmers’ Market, by Tasha DeSerio & Jodi Liano (Weldon Owen, 2010)

Alissa's notes: Seriously, use as much cheese as your little heart desires! I think I used about 1 1/2 cups of mozzarella. Also, I used Pecorino Romano cheese instead of Parmigiano-Reggiano. Any hard cheese will do. I bought Pepperidge Farm puff pastry, but the sheet seemed kind of small, so I rolled it out a little bit with my rolling pin. If you bake this on a stone, you don't need the parchment paper. I'm making this recipe again this week, since we loved it and I still have so many tomatoes to use up!

RATING: 5 cupcakes 


Sunday, August 22, 2010

The Curse of the Zucchini

Every summer I have the same dilemma. Too many zucchinis, not enough recipe ideas. This summer, of course, wasn't any different. We had some very large zucchinis in our garden. I don't exactly "love" zucchini. It's okay in vegetable lasagna, and I've even made a "zucchini parmigiana" where it is breaded, fried, and topped with sauce and cheese. This summer I have tried two new recipes, both of which I (and other "taste-testers") have really enjoyed. The first is a Chocolate Zucchini Cake. This cake is so deliciously moist and dense. You would never even know that it contains zucchini. It's just sweet enough without being overly sweet. The second recipe is Blueberry Zucchini Bread. Yum! What a nice change from boring, old zucchini bread. Usually I would add chocolate chips, but blueberries were a healthier option and I really enjoyed the tart, little bursts of flavor. I'm hoping to add more zucchini recipes to my repertoire every summer so I can gradually overcome the "curse of the zucchini"!


Chocolate Zucchini Cake

2 C. flour
2 C. sugar
3/4 C. cocoa powder
2 tsp baking soda
1 tsp baking powder
1/2 tsp salt
4 eggs
1 C. vegetable oil
3 C. peeled, grated zucchini
1/2 C chocolate chips

1. Preheat oven to 350 degrees. Grease and flour 9x13" baking pan.
2. In a medium bowl, stir together flour, sugar, cocoa, baking powder, baking soda, and salt. Add eggs and oil. Mix well. Fold in zucchini and then chocolate chips.
3. Pour into prepared pan. Bake for 50-60 minutes until toothpick comes out clean. Cool cake before frosting or dusting with powdered sugar (optional).

RATING: 5 cupcakes


Blueberry Zucchini Bread

3 eggs, beaten
3/4 C. vegetable oil
3 tsp. vanilla extract
1 3/4 C. sugar
2 C. peeled, shredded zucchini
3 C. flour
1 tsp. salt
1 tsp. baking powder
1/4 tsp. baking soda
1/4 tsp. cinnamon
1 pint of fresh blueberries

1. Preheat oven to 350 degrees. Lightly grease 4 mini loaf pans.
2. In a large bowl, beat together eggs, oil, vanilla, and sugar. Fold in zucchini.
3. In a separate bowl, mix together the dry ingredients. Add to zucchini mixture. Gently fold in blueberries.
4. Transfer to mini loaf pans, filling each 3/4 full.
5. Bake 50 minutes until toothpick inserted in the center comes out clean. Cool in loaf pans for 20 minutes, then run sharp knife around edge of loaf and remove. Cool on wire rack.

RATING: 4 cupcakes


Wednesday, August 18, 2010

Balsamic Chicken Drumettes (recipe courtesy Giada De Laurentiis)

These sweet-but-savory little morsels melt in your mouth. The excellent blend of flavors and the stickiness of the sauce has made this one of my favorite chicken recipes of all time!


Balsamic Chicken Drumettes (recipe courtesy Giada De Laurentiis)

1/2 cup balsamic vinegar
1/2 cup honey
1/2 cup brown sugar
1/4 cup soy sauce
5 sprigs of rosemary
5 garlic cloves, halved
10 to 12 chicken drumsticks
2 tablespoons toasted sesame seeds
1/4 cup chopped fresh flat-leaf parsley

Directions

Combine the balsamic, honey, brown sugar, soy sauce, rosemary sprigs, and garlic cloves, in a large, re-sealable plastic bag. Shake and squeeze the contents of the bag to dissolve the honey and the brown sugar. Add the chicken drumsticks to the bag and seal with as little air as possible in the bag. Place in the refrigerator and marinate for 2 hours.

Preheat the oven to 450 degrees F.

Place the chicken drumsticks on a foil-lined baking sheet. Bake until the skin is caramelized and very dark in spots, about 30 to 35 minutes.

Meanwhile, place the marinade in a small saucepan. Bring the marinade to a boil (in order to kill bacteria). Reduce the heat to simmer and cook over low heat until thick, about 15 minutes. Reserve.

Use a pastry brush to brush some of the cooked marinade on the cooked chicken. Place the chicken on a serving platter. Sprinkle with the sesame seeds and the chopped parsley.

Alissa's notes: I have made these in the oven and also on the grill. Either way, they are FAB!

RATING= 5 cupcakes

Chicken Stroganoff

This recipe was given to me by my friend, Gretchen. It is delicious, husband-approved, and super easy!

Chicken Stroganoff

1 lb. boneless, skinless chicken breasts (I used 5 breasts)
1 can Cream of Mushroom soup
1-16oz. container of sour cream
1 envelope dry Onion soup mix

Mix all ingredients together and pour over chicken breasts in a crock pot. Cook on low for 6 hours. Serve over rice or egg noodles.

Alissa's notes: Hope you like this recipe as much as the hubby and I did!


RATING=5 cupcakes

The Pink Kitchen Recipe Blog

Welcome to The Pink Kitchen! Here you will find new recipes that have been tried and tested by me, Alissa. I've been cooking and baking for years and I'm always on the lookout for an excellent new recipe to try. Why the name "The Pink Kitchen"? Simply because my favorite color is pink and I love to accessorize my kitchen with pink appliances and gadgets! I will be using a "cupcake rating system" to rate recipes (1 cupcake= didn't like....5 cupcakes=LOVED IT!) Eat, drink, and eat some more! Happy cooking!