Welcome to The Pink Kitchen.....where life is fashionably delicious!!!

Wednesday, August 31, 2011

Get Baked

While checking my email tonight, I came across a recipe for Baked Oatmeal. I was so excited to try it and had all the ingredients, so here I am baking at 10:30 at night! :) For those of you who have never tried it, it's the perfect combination of squishy and crispy! It's comfort food at its finest! Traditional oatmeal is just squishy, but with baked oatmeal, you get a nice crispy crust on the top. Plus you can make it on the weekend and have breakfast for the week! Try it with different toppings: fresh fruit, jam, honey, greek yogurt, almonds or pecans (just to name a few). Mine just came out of the oven and I immediately put some in a bowl. I poured some vanilla almond milk on top and drizzled it with honey. Heaven! 


Baked Oatmeal (adapted from The Fresh Market recipe)


Ingredients:


2 1/2 cups quick oats
1/2 cup steel cut oats
2 tsp baking powder
1/2 tsp salt
1/2 tsp ground cinnamon
2 cups milk (or almond milk)
1 egg, beaten
1/3 cup applesauce
1/4 cup vegetable oil
1/4 cup honey
1/4 cup brown sugar, packed
1 tsp vanilla extract
1 cup sliced fresh or frozen fruit (optional)


Directions:


1. Preheat oven to 400 degrees. Grease 9x9 inch baking dish.
2. Combine oats, steel cut oats, baking powder, salt, and cinnamon in a large bowl. Set aside.
3. In a small bowl, whisk together milk, egg, applesauce, oil, honey, brown sugar, and vanilla extract.
4. Add wet ingredients to dry ingredients and stir well to combine. Pour mixture into greased baking dish.
5. Bake uncovered for 20 minutes. Remove from oven and stir/fluff up (stir in fruit if desired). Return to oven and bake an additional 20 minutes until lightly browned and crispy. Serve warm with desired toppings. Leftovers can be refrigerated and microwaved to reheat.


Saturday, August 27, 2011

Dinner and a Hurricane

Just because there's a hurricane doesn't mean I'm going to eat a peanut butter and jelly sandwich for dinner. The rain has officially started, and I'm planning on hibernating for at least the next 24 hours. I was so excited to make this recipe tonight. I found it on Allrecipes.com and wish I would have thought of it myself. It turned out great! I'm just hoping the power doesn't go out tomorrow night, so we can eat the leftovers! I hope everyone has plenty of wine, snacks, and movies on hand. Stay dry! 


Taco Stuffed Shells


Ingredients:


1 pound lean ground beef
1 box pasta shells, cooked
2 tsp chili powder
1/2 tsp garlic powder
1/2 tsp onion powder
1/4 tsp paprika
1 cup water
1 (16oz) can refried beans
1 (16oz) jar salsa
2 cups shredded mild cheddar cheese
1/4 cup sliced green onion
1 cup sour cream


Directions:


1. Preheat oven to 350 degrees. Cook pasta shells according to directions on package. Set shells aside on a baking sheet or piece of aluminum foil to keep from sticking together while cooling.
2. Brown ground beef in a skillet over medium-high heat. Drain oil. Add seasonings and stir to combine. Add 1 cup water and simmer over medium heat for 5 minutes. Stir in refried beans until well blended. Remove from heat and add 3/4 cups of shredded cheddar cheese. 
3. Pour half jar of salsa into a casserole dish and spread to evenly coat bottom of dish.
4. Stuff each cooked pasta shell with about 2 Tbsp of ground beef/bean filling. Place in casserole dish, open side up.
5. Pour remaining salsa evenly over stuffed shells. Cover dish with foil and bake for 40 minutes.
6. Remove foil and top with remaining shredded cheese. Bake an additional 10 minutes uncovered.
7. Remove from oven and let sit 10 minutes before serving. Garnish with sour cream and chopped green onions.


By the way, my new favorite store-bought salsa is Herdez. It's all-natural and preservative free (which is rare for store-bought salsa). It's the perfect consistency for this dish. It has a very fresh taste, too! Love it!


Monday, August 22, 2011

Fields of Lavender

I've always wanted to visit Carousel Farm in Bucks County. It's a lavender farm that not many people have heard of (www.carouselfarmlavender.com). I finally got the chance to go there a few weeks ago with my husband for our anniversary. The farm is breathtaking! It is designed to replicate the rolling hills and lavender fields of the Provence countryside. It's an ideal location for a romantic picnic for two! We walked around, visiting the llamas, donkeys, and honey bees, then ventured into the adorable little gift shop. I bought lavender honey (made on the premises) and culinary lavender. I'm hoping to make little tea cookies with the dried lavender. I was given the idea for this recipe by the woman in the gift shop and thought it would make a great mid-afternoon snack! 


Lavender Honey & Goat Cheese Toasts


Ingredients:


Extra Virgin olive oil
Crusty Italian bread
Fresh goat cheese
Lavender honey (or regular honey)


Directions:


1. Preheat broiler in oven.
2. Slice Italian bread and drizzle one side with olive oil. Place bread, oiled side up, under broiler with oven rack in middle of oven. Watch closely and remove from oven once bread is toasted and browned.
3. Spread goat cheese over warm toast and drizzle with honey. Serve immediately.


Goat cheese and I have a weird relationship. I definitely think it's an acquired taste, kind of like sushi. The first time I tried it, I hated it! Now, it's starting to grow on me and I like it a little more each time. I still think it tastes like a hairy goat sometimes, and had to laugh when the man at the Wegman's cheese counter and I had a short discussion about goat cheese. I told him I was looking for a really good goat cheese and he asked me "Do you like it really 'goaty'?" I had to laugh when I told him "no" because that is exactly how I would describe goat cheese- "goaty"! So if you're new to goat cheese and trying it for the first time, I recommend going to Wegman's since they have a large selection and the "cheese gurus" can help you find the perfect one! 


Here are a few more pictures from Carousel Farm! The peak lavender season is July, so we just missed it. I'm already planning to return next summer when the fields are full of purple!


Saturday, August 20, 2011

Melt in Your Mouth

Recently I've developed a very serious addition to Krispy Creme doughnuts. It's absolutely ridiculous! It all started when one of my dialysis patients brought them in for myself and my coworker. Ever since then, we can't get enough. They literally melt in your mouth! If you've never had one, I highly recommend you walk, run, or fly to the nearest location. I'm lucky that the closest Krispy Creme store is about an hour away from my house, otherwise, I'd start looking like a doughnut around my midsection! They are always fresh, sometimes even warm! I recommend the original glazed, cinnamon bun, or jelly-filled variety. This recipe has nothing to do with doughnuts, but these cupcakes have the same "melt in your mouth" texture that I LOVE! Plus it doesn't get much better than chocolate and cream cheese!


Black-Bottom Cupcakes (adapted from the Brown Eyed Baker blog)

Ingredients:

Filling-
8 oz. cream cheese, at room temperature
1/3 cup granulated sugar
1 large egg, at room temperature
1/2 cup Ghiradelli bittersweet chocolate chips

Cupcakes-
1 1/2 cups all-purpose flour
1 cup firmly packed light brown sugar
5 Tbsp. unsweetened cocoa powder
1 tsp. baking soda
1/4 tsp. salt
1 cup water
1/3 cup vegetable oil
1 Tbps. apple cider vinegar
1 1/2 tsp vanilla extract

Directions:

1. Preheat oven to 350 degrees. Grease or line a 12-cup muffin tin with paper muffin cups.
2. Beat together cream cheese, sugar, and egg until smooth. Stir in chocolate chips. Set aside.
3. Whisk together flour, brown sugar, cocoa powder, baking soda, and salt. In a separate bowl, mix together water, oil, vinegar, and vanilla.
4. Make a well in the center of the dry ingredients and gently whisk in wet ingredients. Whisk just until smooth (over-mixing will make the cupcakes tough.)
5. Divide batter among the muffin cups, filling about 3/4 full. Spoon a few tablespoons of the cream cheese filling into the center of each cupcake. The cups will be almost completely full.
5. Bake in center of oven for 25 minutes, or until tops are slightly golden brown and the cupcakes feel springy when pressed. Remove from muffin tin to cool on wire rack. Store in refrigerator.
If you eat one while they are still warm, that's when they are the gooiest! :) They also taste great after you refrigerate them!
Remember the "lickable" wallpaper in the movie Willy Wonka? Well, I wish you could lick your screen and taste this cupcake! 

Friday, August 19, 2011

Salty and Sauerkrauty

Oh, the Reuben. As in the Reuben sandwich. Whoever thought that all those crazy, intense flavors mixed together would taste so delicious! Thinking about reubens got me wondering where on earth they came from in the first place. According to Wikipedia, it was either invented by a Lithuanian-born grocer from Omaha, Nebraska named Reuben Kulakofsky, or a deli-owner from New York named Arnold Reuben. In print it dates back to 1926. Well, I don't really care who invented it, all I know is that it's yummy! This casserole doesn't have all the traditional reuben ingredients, but the flavor is basically the same. Salty, creamy, and sauerkrauty (yeah, that's right, I said sauerkrauty)! 

Reuben Casserole (adapted from Family Circle magazine)

Ingredients:

2 Tbsp. unsalted butter
1 half medium onion, chopped
1 (14.5 oz.) can sauerkraut, drained
1 cup dry white wine
3 russet potatoes, washed and peeled
1 package (14 oz.) kielbasa or turkey kielbasa, sliced thin
1 (8 oz.) bag shredded swiss cheese
2 tsp. cornstarch

Directions:

1. Heat oven to 375 degrees. Coat a casserole dish or 10x10 inch baking dish with cooking spray.
2. Melt butter in skillet over medium heat. Add onion and cook 5 minutes until soft and translucent. Remove from heat and transfer onion to a bowl. Stir in sauerkraut. Return empty skillet to heat and add wine. Heat through for about 1 minute.
3. Thinly slice potatoes with a food processor or mandoline. Begin layering: Spread half the potatoes in a thin layer on the bottom of casserole dish. Top with half of the sauerkraut mixture and then half of the sliced kielbasa.
4. In a medium bowl, toss swiss cheese with cornstarch. Pour half of the wine over the kielbasa, then top with half the cheese. Add second layer of potatoes, remaining sauerkraut, then remaining kielbasa. Pour remaining wine over kielbasa then sprinkle with remaining cheese.
5. Coat a sheet of foil with nonstick spray and cover dish. Bake covered for 1 1/2 hours, then uncover and bake an additional 30 minutes or until potatoes are tender.

As I am typing this blog entry, it is August 18th, which means it's the 1 year anniversary of The Pink Kitchen! Thank you to all of you who read and comment on my blog! It really means a lot to me! XOXO ~Alissa

Monday, August 8, 2011

Getting Sneaky with Onions

What is it about caramelized onions that is just so stinkin' delish!?! I love how they become so sweet, tender, and almost sticky. Whenever I see a recipe with onions as a main ingredient, I usually push it to the side since my husband HATES onions. We just celebrated our 4th wedding anniversary and over the past few years, I must say, I have become quite an expert at "sneaking" onions into things without him even knowing! So I thought I was in the clear when preparing this recipe, since I was planning to have the quiche baked by the time he came home. Plus, the onions are caramelized, which means they typically melt in your mouth and don't have any crunch left to them (which I think is the part about onions he hates the most.) Well, of course he walks in the door when I'm in the middle of assembling the quiche, meanwhile a WHOLE sliced onion is laying on my cutting board! BUSTED! He immediately gives me "the look", as I throw the pile of onion slices into the bacon grease and tell him "don't worry, babe, I'm cooking them in bacon grease. They won't even taste like onions by the time I'm done with them!" So, we ate the quiche for dinner and guess who went back for seconds? Yup, that's right. My onion-hating husband! 


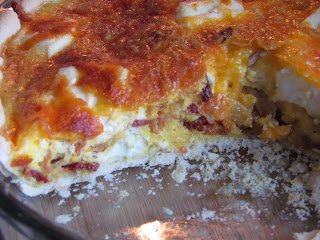
 Caramelized Onion and Bacon Quiche


Ingredients:


1 refrigerated 9" pie crust
1/2 pound bacon
1 medium white onion, sliced
8 eggs
1/4 cup milk
1/4 tsp salt
1/4 tsp pepper
5 ounces cream cheese, softened and cubed
3/4 cup shredded cheddar cheese


Directions:


     1. Preheat oven to 350 degrees.

2. Allow pie crust to come to room temperature, then place in pie plate, sealing around edges. Poke bottom of crust with a fork (to prevent crust from "puffing up" while baking without any filling.) Bake crust for 10 minutes, then remove from oven.
3. Cut bacon into large, bite-sized pieces. Cook in a large skillet over medium heat until browned. Drain on paper towels. Set aside.
4. Add onions to leftover bacon grease and cook over medium heat until caramelized (at least 15 minutes.) Drain onions on paper towels.

5. Whisk together eggs, milk, salt, and pepper in a large bowl.

6. Place bacon pieces into partially cooked pie crust. Layer caramelized onions over the bacon and top with small cubes of cream cheese. Pour egg mixture over top. Sprinkle with cheddar cheese.

7. Bake about 35 minutes until eggs are set and crust is golden brown. Remove from oven and allow to cool for 5 minutes before slicing.


If you are going to cook a whole pound of bacon and buy two refrigerated pie crusts, you can also make 6 mini quiches in a muffin pan. Just add 4 additional eggs to the egg mixture and an extra splash of milk. Use a biscuit cutter or bottom of a drinking glass to cut little circles out of the extra pie crust. Assemble the mini quiches the same way and bake for about 20 minutes in a muffin pan.


Saturday, August 6, 2011

Too Many Zucchinis

Last year, I dedicated one of my posts to "the curse of the zucchini" since I always end up with millions of them and run out of ideas for recipes. I actually just finished baking a chocolate zucchini cake and my house smells so yummy right now. (If you want the recipe, it's under August 2010 on my blog. It's a great recipe if you have those really big zucchinis that don't taste that great cooked by themselves. Just be sure to scoop the big seeds out first.) This recipe is another good one for those mega zucchinis! Don't be confused by the name. There isn't ANY crabmeat in these little cakes, but you would never know! 


Zucchini "Crab" Cakes


Ingredients:


2 1/2 cups grated zucchini
1 egg, beaten
2 Tbsp butter, melted
1 cup plain bread crumbs
1/4 cup finely minced onion
1 tsp Old Bay seasoning
1/4 cup flour
1/2 cup vegetable oil


Directions:

1. In large bowl, combine zucchini, egg, and butter. Stir in bread crumbs, onion, and seasoning. Mix well. 

2. Shape mixture into patties and dredge in flour. 

3. Heat oil in skillet over medium-high heat. Fry cakes in oil until golden brown on both sides.

4. Remove cakes from oil and place on paper towels to soak up excess grease. Season with salt and pepper if desired.

See how many people you can trick into thinking these are real crab cakes! :)